
How to Prepare a Water Dispenser Before Use
How to Properly Prepare a Brand-New Water Dispenser Before Use
There is nothing quite like the convenience of a water dispenser. Whether it’s piping hot water for your morning tea or ice-cold hydration after a workout, it’s the ultimate kitchen (or office) luxury.
You’ve just unboxed your shiny new dispenser, and you’re probably tempted to pop a water bottle on top and start drinking immediately. Stop right there!
Before you take that first sip, your water dispenser needs a little TLC. Skipping the preparation and sanitization phase can leave your water tasting like factory plastic—or worse, harboring dust and germs from the manufacturing and shipping process.
Don't worry, the process is simple. Here is your step-by-step guide to preparing a water dispenser before its very first use.
Step 1: Unbox and Inspect
First things first: get everything out of the box. Remove all protective tape, plastic wrapping, and cardboard inserts. Take a quick moment to inspect the unit for any shipping damage. Check the power cord, the spigots, and the drip tray to ensure everything is intact.
Step 2: Wash the Removable Parts
Before water touches any part of the machine, you need to clean the components that are easy to remove.
- The Drip Tray and Grid: Pull these out and wash them in warm, soapy water. Rinse thoroughly and dry.
- The Smart Seat (Baffle/Funnel): Most top-loading and some bottom-loading dispensers have a plastic funnel where the bottle sits (often featuring a spike to puncture the bottle cap). This part is usually removable. Take it off and wash it with mild dish soap, rinse, and set aside.
Step 3: Sanitize the Internal Reservoirs
This is the most crucial step. Dust, oils, and residues from the factory floor often settle inside the internal hot and cold tanks.
Here is how to do a basic initial flush and sanitize:
- Mix a cleaning solution: Mix one tablespoon of unscented household bleach with one gallon of hot water. (Alternative: If you prefer to avoid bleach, you can use a mixture of equal parts white vinegar and warm water).
- Pour it in: Remove the smart seat and carefully pour the cleaning solution directly into the top reservoir of the dispenser.
- Drain the lines: Place a bucket or large pitcher under the water spigots. Press both the hot and cold water buttons/paddles until water begins to flow out of the spigots. This ensures the cleaning solution fills the internal pipes and tanks.
- Let it sit: Let the solution sit inside the machine for about 10 to 15 minutes to break down any germs or manufacturing residue.
Step 4: Flush the System (Thoroughly!)
You definitely don't want your water tasting like bleach or vinegar. Now it's time to rinse the system out completely.
- Drain the remaining cleaning solution out of the spigots into a bucket until the machine is empty.
- Fill the top reservoir with clean, fresh tap water.
- Flush this water through the spigots into the bucket until the reservoir is empty again.
- Pro Tip: Repeat this plain water flush at least two to three times to ensure all traces of the cleaning solution are completely gone.
Step 5: Install the Water Bottle
Now that your machine is sparkling clean on the inside, you’re ready to load your first water jug (3-gallon or 5-gallon).
- For Top-Loading Dispensers: Remove the cap from the water bottle (or use a piercing cap if your dispenser supports it). Quickly and carefully flip the bottle upside down and fit it into the smart seat. You should hear a glug-glug sound as water fills the internal reservoirs.
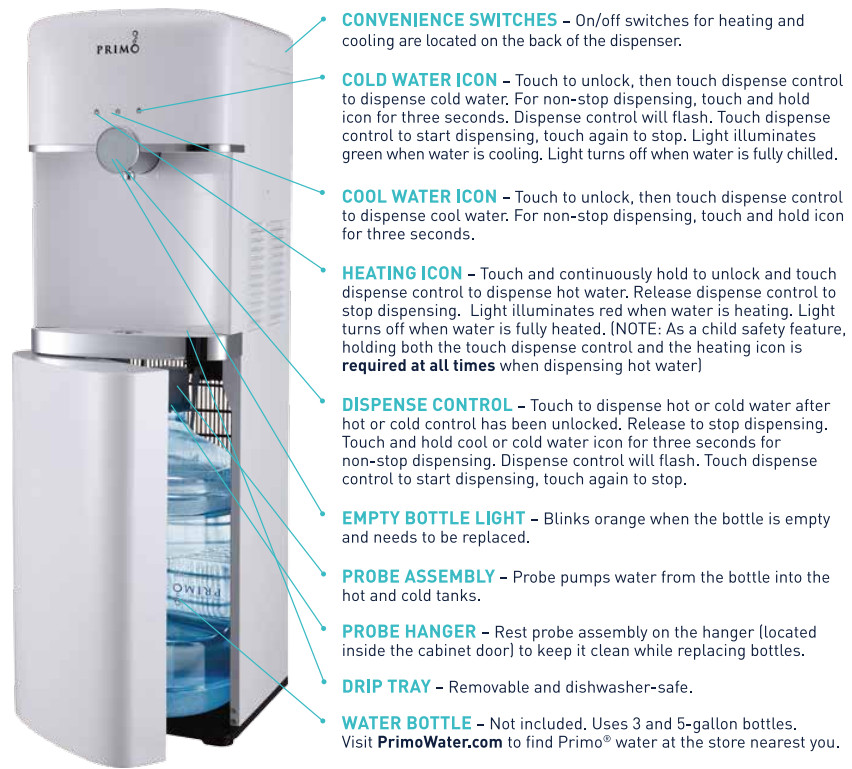
- For Bottom-Loading Dispensers: Insert the probe assembly into the water bottle and push the bottle down into the cabinet compartment, closing the door securely.
Step 6: Prime the Water Lines (Crucial for Hot Water!)
Before you plug the machine into the wall, you must prime the lines.
- Place your cup under the spigots.
- Press both the cold and hot water buttons until a steady stream of water flows out.
- Why do this? If you turn on the heating switch before water fills the hot water tank, the internal heating element can burn out dry, permanently damaging your brand-new machine.
Step 7: Plug It In and Power On
Once water is flowing freely from the spigots, plug the power cord into a grounded electrical outlet.
- Turn on the switch at the back of the machine for the cold water (if applicable).
- Turn on the switch for the hot water (if applicable).
Allow about 15 to 30 minutes for the water to reach the desired chilling and heating temperatures